AWS Lambda pipelines
This article focuses on using an out-of-the-box Amazon Web Services (AWS) Lambda resource. For further customization, use the open_pipes_session instead.
This article covers how to use Dagster Pipes with Dagster's AWS Lambda integration to invoke a Lambda function and execute external code.
Dagster Pipes allows your code to interact with Dagster outside of a full Dagster environment. The environment only needs to contain dagster-pipes, a single-file Python package with no dependencies that can be installed from PyPI or easily vendored. dagster-pipes handles streaming stdout/stderr and Dagster events back to the orchestration process.
Prerequisites
To run the examples, you'll need to:
- Create a new Dagster project:
uvx create-dagster@latest project <project-name> - Install the necessary Python libraries:
- uv
- pip
Install the required dependencies:
uv add dagster-aws
Install the required dependencies:
pip install dagster-aws
- Configure AWS authentication credentials. If you don't have this set up already, see the boto3 quickstart.
- In AWS, you'll need:
- An existing AWS account with access to Lambda
- Permissions that allow you to create and modify Lambda functions
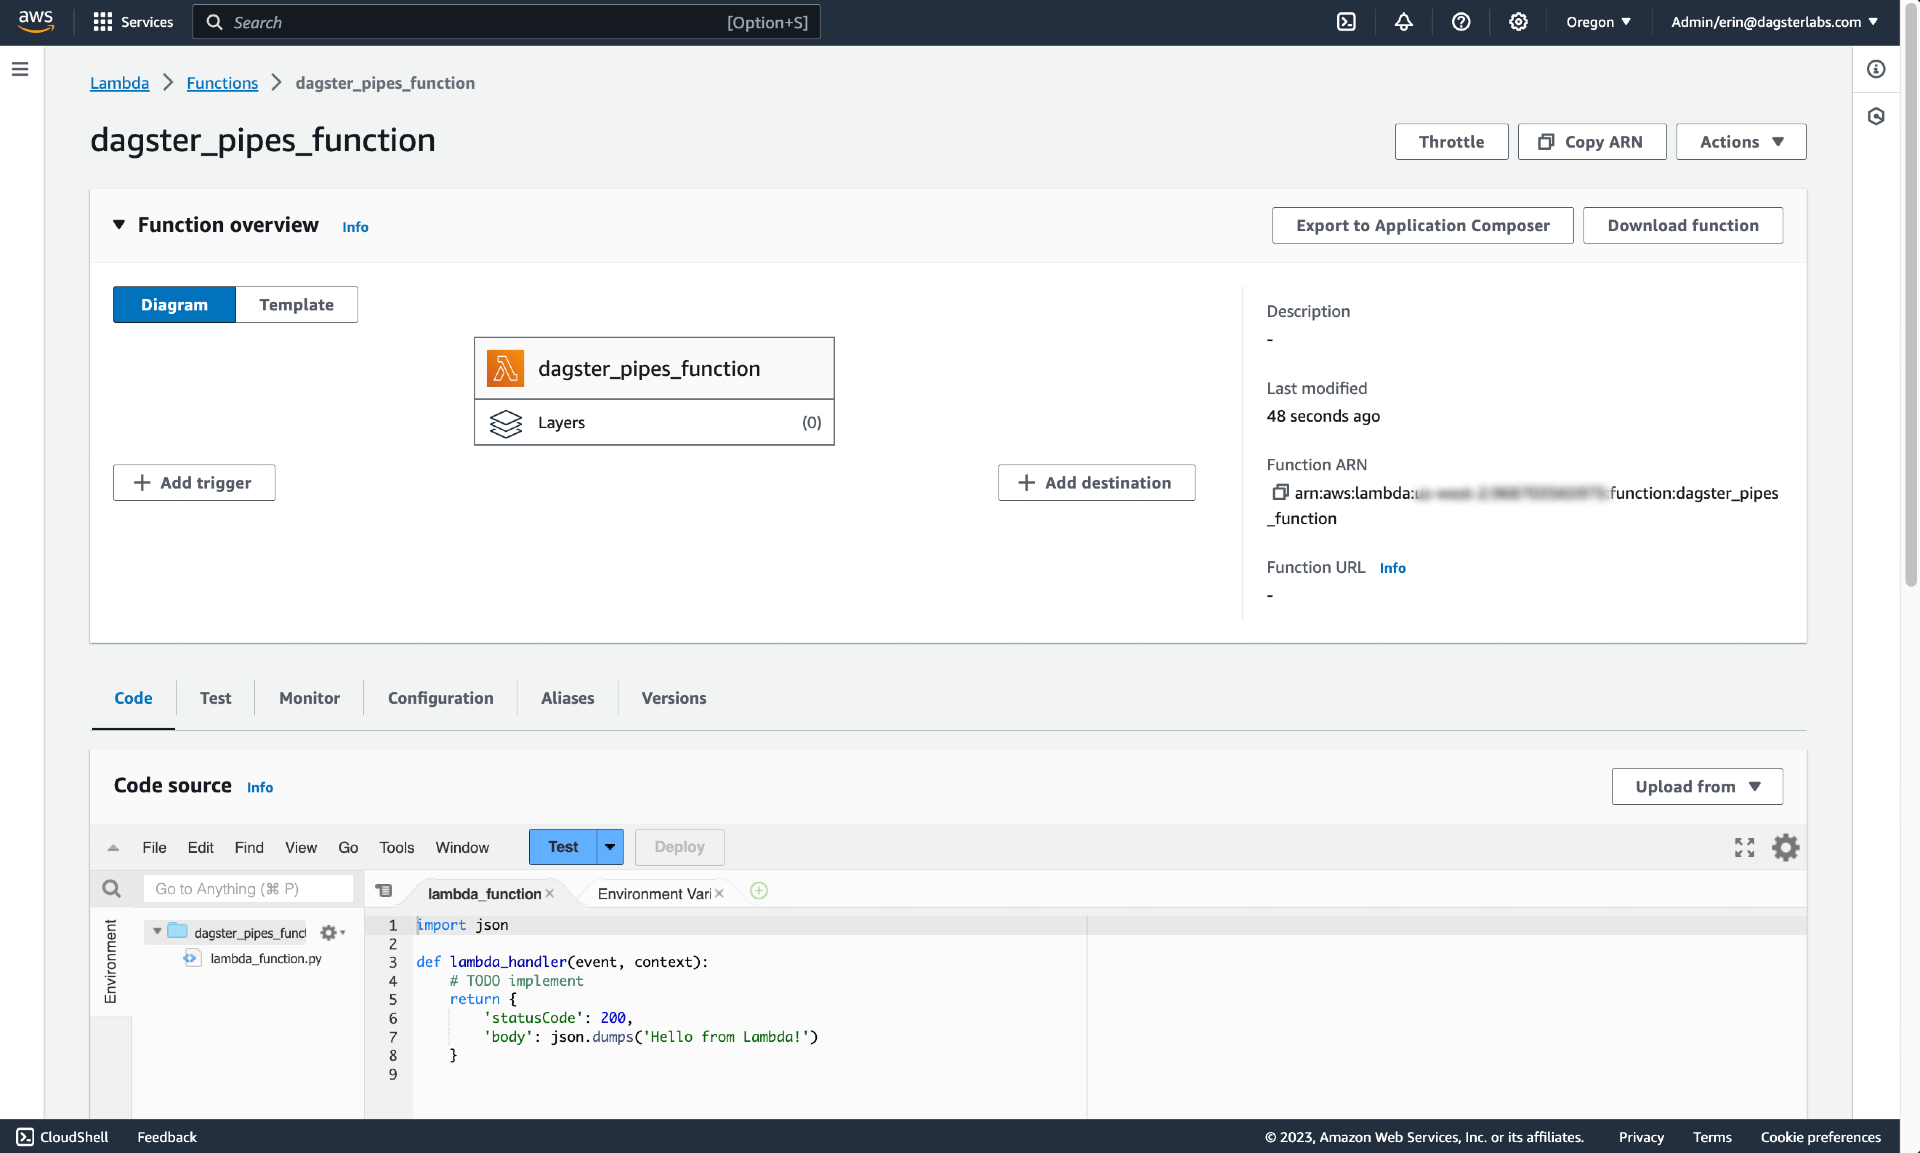
Step 1: Create a Lambda function
First, you'll create a Lambda function using the AWS UI.
Step 1.1: Create the function in the AWS UI
For simplicity we're demonstrating this step using the UI, but you can also do this programmatically. Refer to the AWS Lambda documentation for more info.
- Sign into the AWS console.
- Navigate to Lambda.
- On the Lambda page, click Create function.
- On the Create function page, fill in the following in Basic information:
- Function name - Enter a name for the function. For example:
dagster_pipes_function - Runtime - Select Python 3.10
- Function name - Enter a name for the function. For example:
- Click Create function.
After the function is created, you'll be redirected to a page like the following:
Step 1.2: Add a dagster-pipes file
Next, you'll add dagster-pipes to the function.
For simplicity, we're going to copy the contents of the single Dagster Pipes file and add it to the function. While this means we won't automatically receive future updates, Dagster aims to only make changes that are backwards-compatible. This means we'll have to periodically check for updates, but it's unlikely we'll have to update our code in any significant way.
-
In the Code source section of the page, add a new file. This can be accomplished with File > New file or by clicking the green + icon next to the open
lambda_functiontab:
-
In a new browser tab, navigate to the following URL:
https://raw.githubusercontent.com/dagster-io/dagster/master/python_modules/dagster-pipes/dagster_pipes/__init__.py -
Copy the contents of
__init__.pyinto the new file you created in AWS. We recommend adding the source link and the date you copied the contents to the top of the file as comments: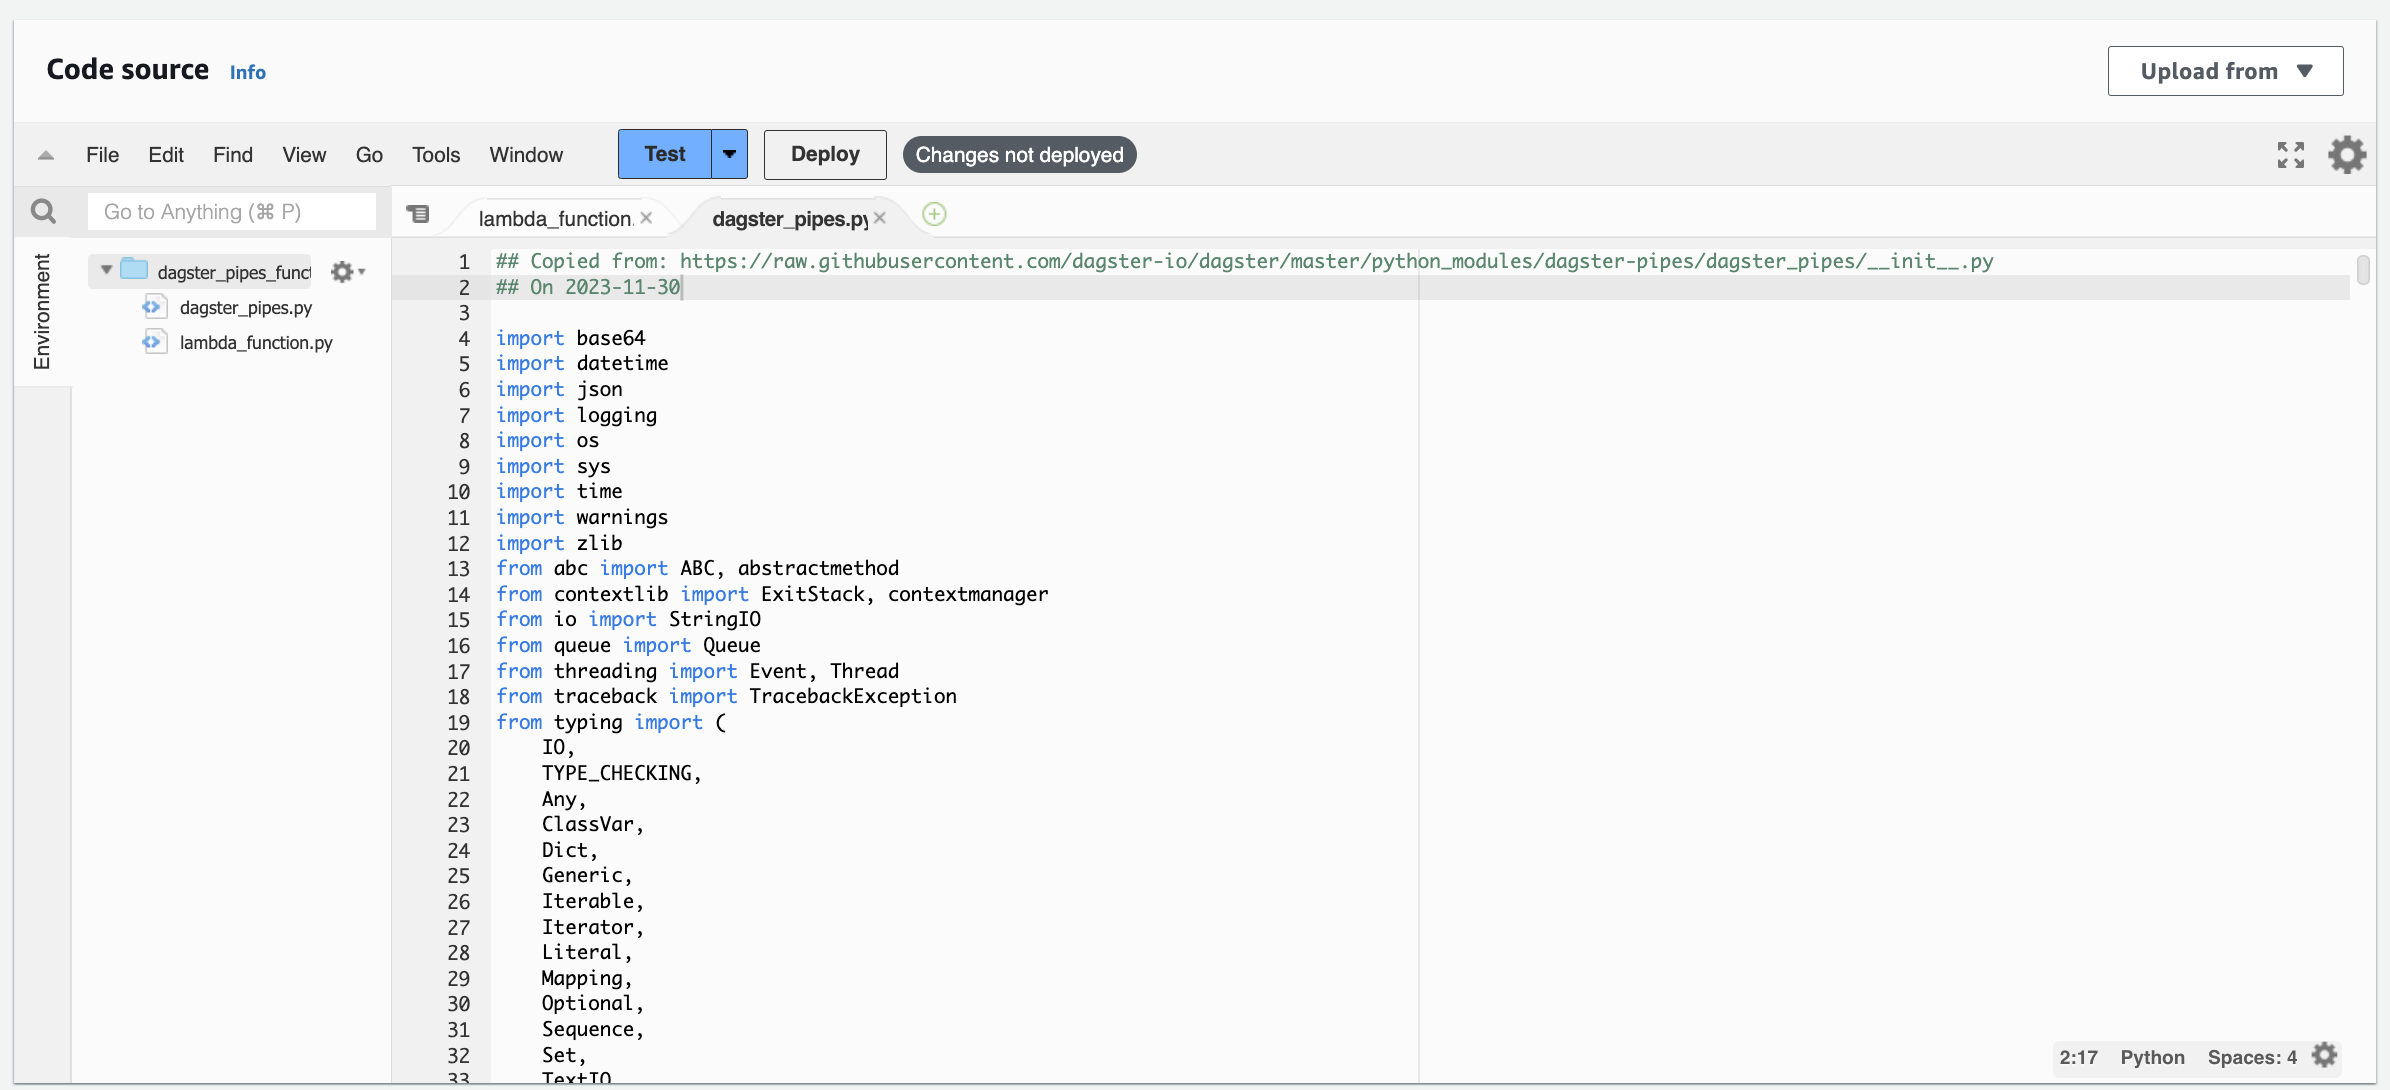
-
Save the file as
dagster_pipes.py.
Step 1.3: Add the code to execute to the function
In this step, you'll add the code you want to execute to the function. Create another file in the AWS UI - or use the default lambda_function.py file created by the function - and paste in the following code:
from dagster_pipes import PipesMappingParamsLoader, open_dagster_pipes


def lambda_handler(event, _context):
    with open_dagster_pipes(
        params_loader=PipesMappingParamsLoader(event),
    ) as pipes:
        # Get some_parameter_value from the event payload
        some_parameter_value = event["some_parameter_value"]

        # Stream log message back to Dagster
        pipes.log.info(f"Using some_parameter value: {some_parameter_value}")

        # ... your code that computes and persists the asset

        # Stream asset materialization metadata and data version back to Dagster.
        # This should be called after you've computed and stored the asset value. We
        # omit the asset key here because there is only one asset in scope, but for
        # multi-assets you can pass an `asset_key` parameter.

        pipes.report_asset_materialization(
            metadata={
                "some_metric": {"raw_value": some_parameter_value + 1, "type": "int"}
            },
            data_version="alpha",
        )
The metadata format shown above ({"raw_value": value, "type": type}) is part of Dagster Pipes' special syntax for specifying rich Dagster metadata. For a complete reference of all supported metadata types and their formats, see the Dagster Pipes metadata reference.
Let's review what this code does:
-
Imports
PipesMappingParamsLoaderandopen_dagster_pipesfromdagster_pipes -
Defines a Lambda function handler, which is a method in function code that processes events. This method accepts
eventandcontextarguments, which map to theeventpayload andcontextwe'll define in our Dagster asset. -
Initializes the Dagster Pipes context (
open_dagster_pipes), which yields an instance ofPipesContextcalledpipes.On the orchestration side - which we'll discuss in the next section - we'll set up a Dagster asset that uses the
pipes.PipesLambdaClientto inject information needed for Pipes in aneventpayload. In this code on the AWS Lambda side, we're passing this payload toPipesMappingParamsLoaderand using it inopen_dagster_pipes.We're using the default context loader (
PipesDefaultContextLoader) and message writer (PipesDefaultMessageWriter) in this example. These objects establish communication between the orchestration and external process. On the orchestration end, these match a correspondingPipesLambdaEventContextInjectorandPipesLambdaLogsMessageReader, which are instantiated inside thepipes.PipesLambdaClient. -
Inside the body of the context manager (
open_dagster_pipes), retrieve a log and report an asset materialization. These calls use the temporary communications channels established byPipesDefaultContextLoaderandPipesDefaultMessageWriter. To see the full range of what you can do with thePipesContext, see the API docs or the general Pipes documentation.
At this point you can execute the rest of your AWS Lambda code as normal, invoking various PipesContext APIs as needed.
Step 1.3: Deploy the function��
When finished, click the Deploy button to update and deploy the function.
Step 2: Create the Dagster objects
In this step, you'll create a Dagster asset that, when materialized, opens a Dagster pipes session and invokes the Lambda function you created in Step 1.
Step 2.1: Define the Dagster asset
You can scaffold assets from the command line by running dg scaffold defs dagster.asset <path/to/asset_file.py>. For more information, see the dg CLI docs.
In your Dagster project, create a file named dagster_lambda_pipes.py and paste in the following code:
import boto3
from dagster_aws.pipes import PipesLambdaClient

import dagster as dg


@dg.asset
def lambda_pipes_asset(
    context: dg.AssetExecutionContext, lambda_pipes_client: PipesLambdaClient
):
    return lambda_pipes_client.run(
        context=context,
        function_name="dagster_pipes_function",
        event={"some_parameter_value": 1},
    ).get_materialize_result()
Here's what we did in this example:
-
Created an asset named
lambda_pipes_asset -
Provided
AssetExecutionContextas thecontextargument to the asset. This object provides access to system APIs such as resources, config, and logging. -
Specified a resource for the asset to use,
pipes.PipesLambdaClient, which is a pre-built Dagster resource that allows you to quickly get Pipes working with AWS Lambda.We also specified the following for the resource:
context- The asset'scontext(AssetExecutionContext) datafunction_name- The name or ARN of the function to invoke. This info can be found on the function's details page in AWS. In our example, the function is nameddagster_pipes_functionevent- A JSON-serializable object containing data to pass as input to the Lambda function
This argument is passed to the
runmethod ofpipes.PipesLambdaClient, which submits the provided information to the botoinvokeAPI and then invokes the specified function (function_name). -
Returned a
MaterializeResultobject representing the result of execution. This is obtained by callingget_materialize_resulton thePipesClientCompletedInvocationobject returned byrunafter the execution in AWS Lambda has completed.
Step 2.2: Create Dagster definitions
You can scaffold resources from the command line by running dg scaffold defs dagster.resources <path/to/resources_file.py>. For more information, see the dg CLI docs.
Next, you'll add the asset and AWS Lambda resource to your project's code location via the Definitions object. This makes the resource available to other Dagster definitions in the project.
Copy and paste the following to the bottom of dagster_lambda_pipes.py:
import boto3
from dagster_aws.pipes import PipesLambdaClient

import dagster as dg


@dg.definitions
def resources():
    return dg.Definitions(
        resources={
            "lambda_pipes_client": PipesLambdaClient(client=boto3.client("lambda"))
        }
    )
Sometimes, you may want to transition data pipelines between development and production environments without minimal code changes. To do so, you can use the Resources system to vary the Pipes clients based on different deployments. For example, you can specify different configured boto3 clients. Or, you may handle the switch by swapping underlying AWS environment variables between deployments. For more information, see Testing against production data with Dagster+ branch deployments.
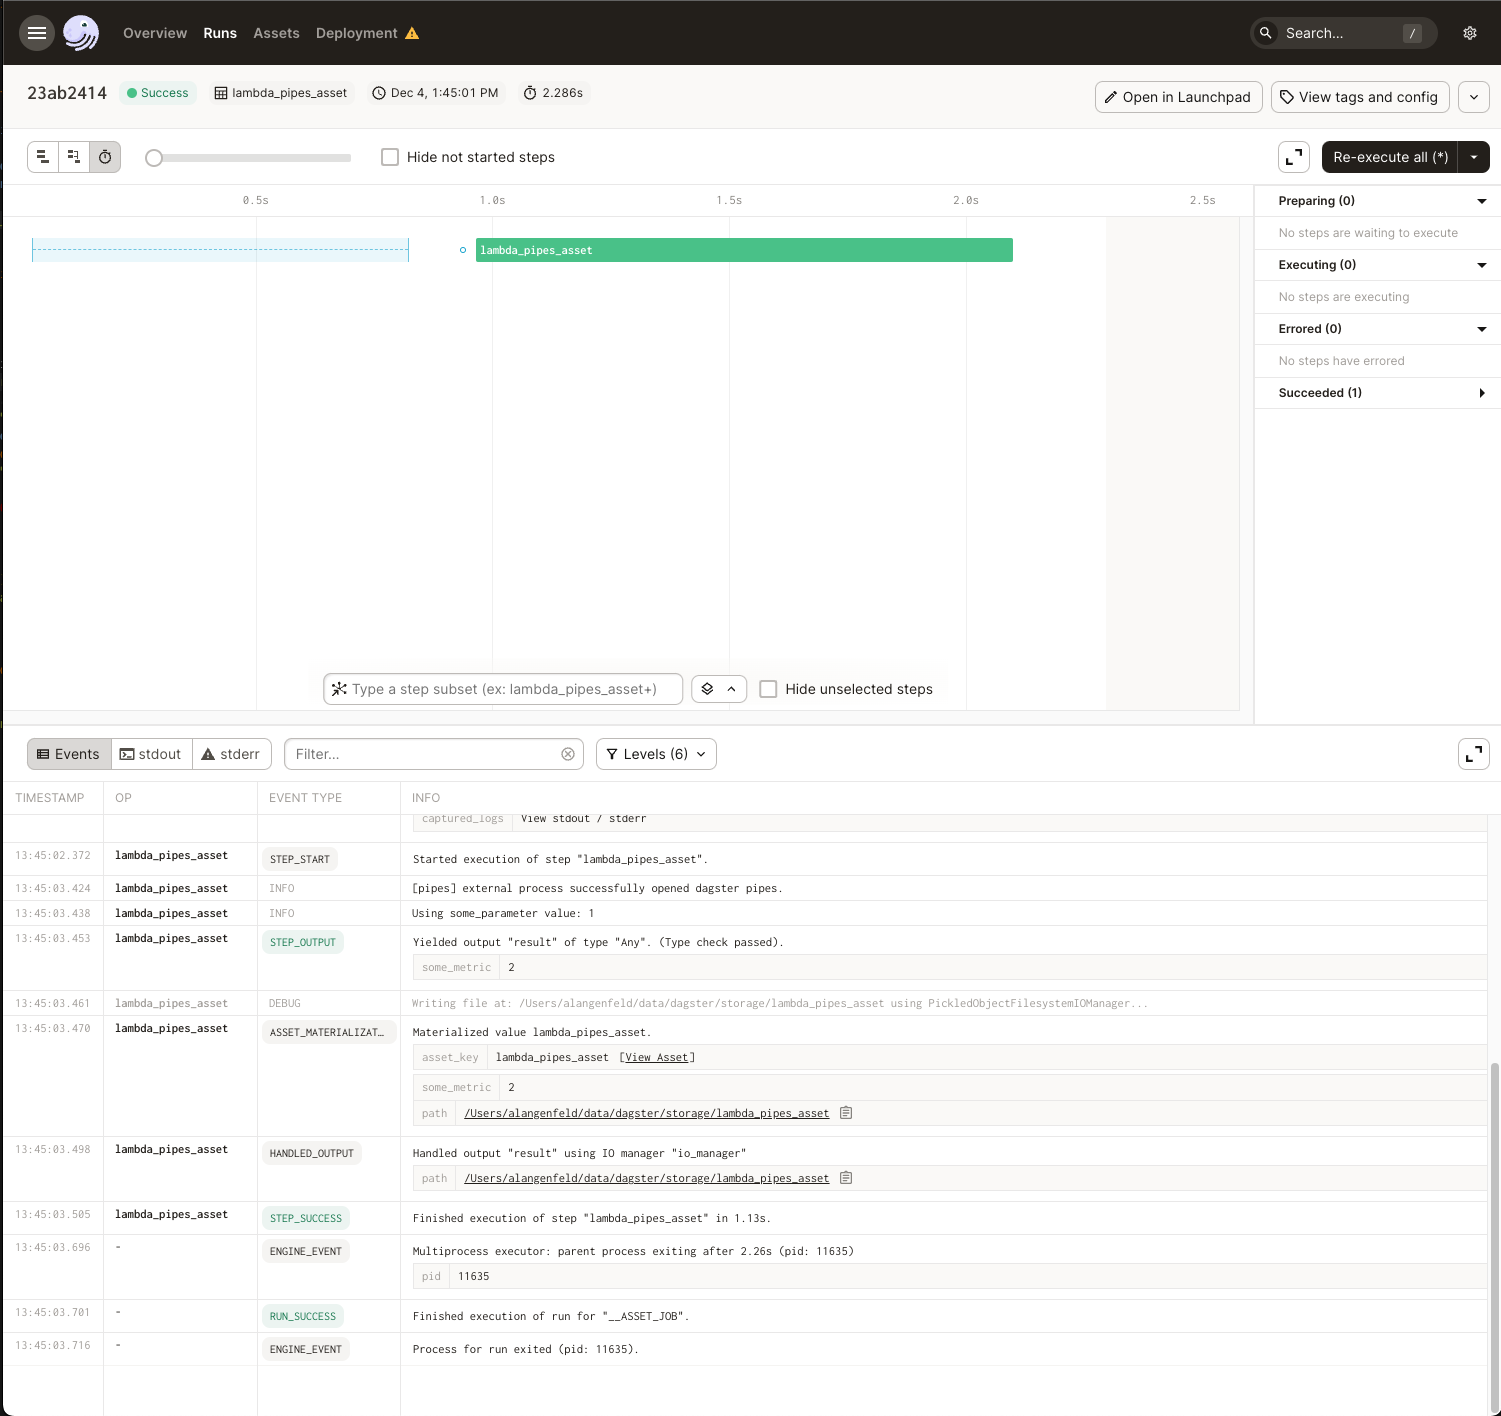
Step 3: Invoke the AWS Lambda function from the Dagster UI
In this step, you'll invoke the AWS Lambda function you defined in Step 1 from the Dagster UI.
-
In a new command line session, run the following to start the UI:
dg launch --assets lambda_pipes_asset -
Navigate to localhost:3000, where you should see the UI.
-
Click Materialize near the top right corner of the page, then click View on the Launched Run popup. Wait for the run to complete, and the event log should look like this: